
How to Bridge to AVAX (Avalanche) : A Step-by-Step Guide
Developers of decentralised applications and smart contracts on the Ethereum mainnet often encounter a dilemma between security and scalability. While the Ethereum network is secure and decentralised, its scalability is limited by the number of transactions processed per second. This leads to high fees and network congestion, hindering the adoption of dApps.
One solution to this issue is to use an EVM-compatible blockchain like Avalanche (AVAX), an independent blockchain platform designed to overcome some of the barriers to scalability mentioned above.
The Avalanche network (of networks) is a platform for creating decentralised networks and applications. It allows for creating multiple customisable subnets, called “virtual chains,” that can be tailored to specific use cases. Each virtual chain can have its own consensus mechanism and governance rules. This allows for a high degree of flexibility and scalability, as each virtual chain can process transactions independently and at high throughput. Overall, Avalanche aims to be a highly efficient, secure, and customisable platform for building decentralised applications and networks.
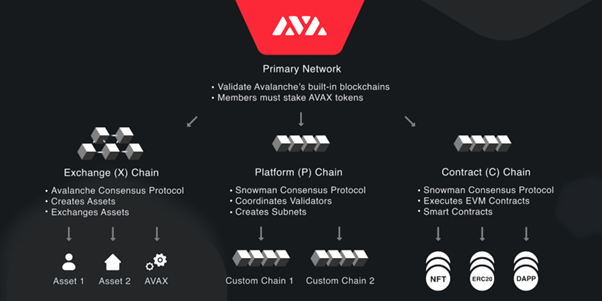
A high-level overview of the Avalanche network design. Source: Avalanche
This article will guide developers through the process of bridging their smart contracts to Avalanche to enhance scalability and minimise network congestion.
Prerequisites
In order to move a smart contract or dApp from the Ethereum mainnet to Avalanche, certain technical abilities and knowledge may be necessary, such as:
- Understanding of Ethereum: Having knowledge of how the Ethereum platform operates, as well as experience building smart contracts and dApps on it.
- Solidity proficiency: Solidity is the programming language used for writing smart contracts on Ethereum, proficiency in it is necessary for migrating smart contracts to Avalanche.
- js expertise: Web3.js is a library that allows developers to interact with the Ethereum blockchain using JavaScript. This library may be required for migrating dApps to Avalanche.
- Knowledge of Avalanche: Understanding how Avalanche works, including its architecture and how to build and deploy smart contracts and dApps on it.
Additionally, certain tools and resources may be necessary, such as:
- An Ethereum wallet: This is required to hold the Ether (ETH) needed to pay transaction fees on the Ethereum mainnet. It is also important to add Avalanche to Metamask as an additional network.
- An AVAX testnet account: You will need to create an account to test and deploy smart contracts and dApps on the Avalanche testnet.
- Additional tools and resources may be required depending on the specific needs of your project, such as a development environment, a version control system, and a testing framework.
Step 1: Understanding the Avalanche network
The Avalanche network is a decentralised platform for creating and managing decentralised applications (dApps) and digital assets. It is designed to address some of the scalability and interoperability issues faced by other blockchain networks, such as the Ethereum mainnet.
One of the key advantages of the Avalanche network is its ability to handle a high volume of transactions. Unlike Ethereum, which can only process a limited number of transactions per second, Avalanche can handle thousands of transactions per second, making it well-suited for applications that require high throughput.
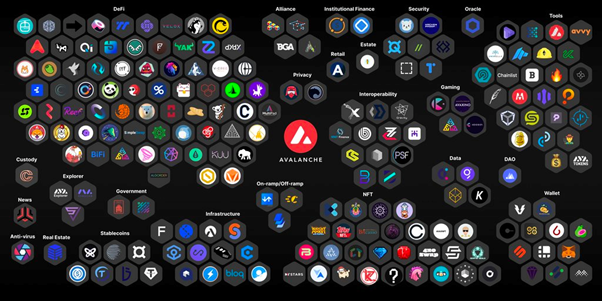 The Avalanche network has attracted hundreds of blockchain applications. Source: AVAX Network
Another advantage of the Avalanche network is its ability to support multiple subnets, or “virtual chains.” Each subnet can have its own consensus mechanism and governance model, allowing for a wide range of use cases and flexibility. This allows for a more diverse set of applications, such as high-performance gaming, stablecoins, and decentralised exchanges.
In addition, Avalanche also has built-in interoperability features, which allow different subnets and even other blockchain networks to communicate and interact with each other. This enables the creation of cross-chain dApps and allows the transfer of assets between different blockchains.
The Avalanche network also has a unique consensus mechanism called Avalanche-X, which combines elements of both Proof-of-Stake and Avalanche-V, a variation of the classic Byzantine Fault Tolerance. This allows for fast and efficient consensus while also ensuring security.
Overall, the Avalanche network offers several key advantages over the Ethereum mainnet, including high throughput, multi-chain support, interoperability, and a unique consensus mechanism. These features make it an attractive option for developers and businesses looking to build decentralised applications and digital assets.
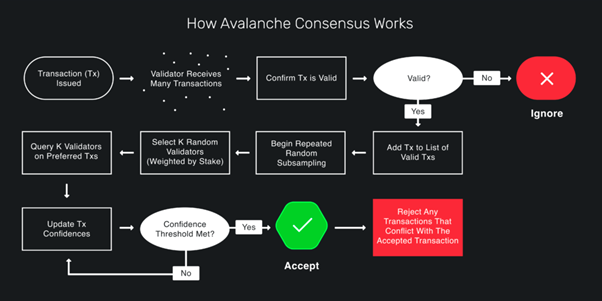 Avalanche’s consensus model explained. Source: https://docs.avax.network/
We also published an in-depth article about how the Avalanche network works, which you can find here: https://www.xdefi.io/avax-avalanche-across-defi/
Step 2: Accessing Avalanche’s C-Chain
The Avalanche C-Chain utilises a modified version of go-ethereum, known as coreth, which replaces the networking and consensus elements with those from Avalanche. The Ethereum Virtual Machine (EVM), which executes Solidity smart contracts and manages data structures and blocks on the chain, remains intact. This results in a blockchain that can run all the Solidity smart contracts from Ethereum but with improved transaction speed and instant finality due to Avalanche’s advanced consensus technology.
Coreth is integrated as a plugin within AvalancheGo, the client node application used to run the Avalanche network. From your decentralised application (dApp) perspective, it will function as it would on Ethereum but with increased performance and cost-efficiency.
The C-Chain offers the same application programming interface (API) as go-ethereum, enabling users to utilise the same familiar APIs accessible on Ethereum for interacting with the platform. This means developers can work with the C-Chain familiarly and seamlessly. Additionally, there are multiple methods to interact with the C-Chain, through MetaMask, Core (Avalanche’s all-in-one operating system) and the Public API Nodes (The C-Chain API endpoint is https://api.avax.network/ext/bc/C/rpc for the Mainnet and https://api.avax-test.network/ext/bc/C/rpc for the testnet).
Step 3: Run your local test network
If you require a private test network to test your decentralised application (dApp), Avalanche Network Runner is an excellent option. It is a shell client that enables the launch of local Avalanche networks, similar to how Ganache operates on Ethereum. This allows developers to test their dApps on a private network before deploying them to the main Avalanche network.
Step 4: Deploying smart contracts
As an Ethereum-compatible blockchain, Avalanche’s C-Chain can utilise the same tools and environments commonly used for Ethereum development to create and deploy dApps. This includes popular tools such as Remix, Truffle, and Hardhat.
Remix is a tool that can be used to deploy smart contracts on Avalanche. A tutorial shows how to use it in combination with MetaMask for access to the Avalanche network.
Truffle is another option that can be used to test and deploy smart contracts on Avalanche, and a tutorial is available to guide developers through the process.
Hardhat is the latest development and testing environment for Solidity smart contracts and is widely used by Avalanche’s developers. It offers excellent testing support and is recommended for development on Avalanche.
Step 5: Use Snowtrace – Avalanche’s Block Explorer
An important aspect of the smart contract development ecosystem is the explorer, which organises and presents blockchain data. The Mainnet C-Chain explorer can be accessed at https://snowtrace.io/, and the testnet explorer can be found at https://testnet.snowtrace.io/. These explorers provide developers with a useful tool for tracking and analysing the data on the blockchain.
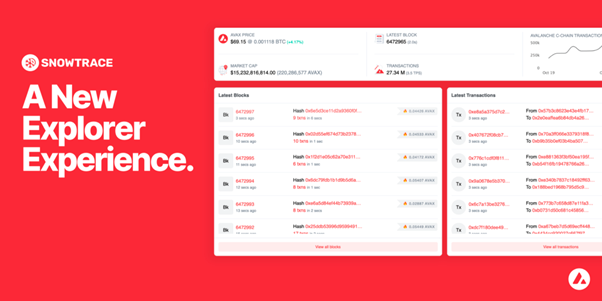 Snowtrace is Avalanche’s Block Explorer. Source: Avalanche
Bridging to Avalanche from the user side
Bridging tokens from Ethereum to the Avax network transfers digital assets from Ethereum to Avalanche blockchain. This can be done by using a token bridge, which is a tool that facilitates the transfer of tokens between different blockchain networks (you can bridge AVAX itself, but also other popular tokens like USDC).
To bridge tokens, you will need to have the token on Ethereum, set up an Avalanche wallet, use a token bridge to transfer the tokens from Ethereum to Avalanche, and then withdraw the tokens to your Avalanche wallet. Another way to move assets from Ethereum to Avalanche is by using wrapped tokens, it allows users to interact with their ERC-20 tokens on Avalanche, but the assets still remain on Ethereum.
One way to initiate a bridge transfer is to use the official Avalanche Bridge. You can also use the XDEFI WebApp or XDEFI Wallet Extension (XDEFI Wallet can also be used as a Binance Smart Chain Wallet and wallet for multiple other blockchains), which has the most popular bridges fully integrated or interact with any individual token bridge like for example Relay Chain or Synapse.
Conclusion
In conclusion, the Avalanche network offers several advantages over Ethereum, such as high throughput, multi-chain support, interoperability and a unique consensus mechanism, making it an attractive option for blockchain developers to migrate their smart contracts.
Avalanche’s ability to handle a high volume of transactions, support multiple subnets and built-in interoperability features enables a wide range of use cases, making it more versatile than Ethereum. Additionally, its unique consensus mechanism Avalanche-X ensures fast and secure consensus. The ability to bridge tokens from Ethereum to Avalanche makes it easy for developers to migrate their existing projects.